You’ve got a good product. The listing is live, and the traffic is coming in. But the add-to-cart (aka conversion) rate is flat.
Nine times out of ten, when a store has traffic but little to no conversions, the product photos are doing the damage. It’s not the copy, nor the price. It’s the photos.
Most store owners think their photos are fine, and that’s the problem. “Fine” isn’t good enough in an ecommerce store where shoppers can’t pick up, touch, or turn the product around. Your photos have to do the work instead.
This post explains why ecommerce product photography is the highest-leverage thing you can fix in your store, what great photos actually have to do, how to tell whether yours are falling short, and how to know when to do it yourself versus bring in help.
If you want the full step-by-step setup, lighting, backgrounds, processing, export settings — we’ve built that out in our complete guide, and there is a link at the end.
What is product photography?
Product photography is the practice of creating images that show your product clearly, accurately, and compellingly enough to make someone want to buy it.
That sounds simple. In practice, it covers a lot: the angle, the background, the lighting, the context, and the consistency across your catalog. Done well, ecommerce product photography makes a product feel real to someone who’s never held it, but done poorly, it gives shoppers a reason to distrust the listing and click away.
For ecommerce specifically, product photography serves a different purpose than advertising or editorial work. The goal isn’t art. It’s the conversion. Every image on your site needs to earn its place by answering one question: Does this make me want to buy?
Shoppers can’t touch your product
Here’s what most store owners don’t fully internalize: online shoppers cannot touch, try on, or smell your product. They cannot walk around it. They cannot hold it up to the light or read the ingredient label unless you photograph it or include the details in the product description.
Every piece of sensory information a customer would gather in a physical store has to come from your images.
The data backs this up. 93% of consumers say visuals are the most important factor in a purchasing decision. Product pages with high-quality images see 33% higher conversion rates on average. And 22% of online purchases are returned because the product looks different from its photos.
A return isn’t just a lost sale. It’s a lost customer, a chargeback risk, and a hit to your seller metrics.
Poor product photography costs you on both ends: it loses sales before checkout and invites returns after. Good ecommerce product photography is one of the few investments in your store that pays you back twice.
It’s 2026, and shoppers have seen a lot of stores now. Their tolerance for dark, blurry, or inconsistent photos is essentially zero. If your photos look amateurish next to a competitor’s, you’ve already lost. First impressions happen in under 100 milliseconds, and in ecommerce, your photos (and brand image) are the first impression.
Four things product photos have to do
Most ecommerce photography fails not because the images look bad, but because they don’t do their job. Here’s what the job actually is.
1. Establish trust immediately
The shopper doesn’t know you. They found your store through a quick search or an ad, and the first thing your photos have to do is make the store feel legitimate — professional, consistent, and clearly invested in showing the product well.
Trust is mostly invisible. In fact, 67% of consumers consider the quality of a product’s images “very important” when choosing and purchasing a product. When photos look professional, shoppers don’t consciously think “these are professional photos.” They just feel comfortable enough to keep scrolling. When photos look amateurish, something registers as off, and shoppers leave without being able to explain why.
2. Answer the questions your product description can’t
A good image answers questions the shopper didn’t even know they had: How big is this actually? What does the texture look like up close? Is that zipper plastic or metal? Does the color actually match the thumbnail?
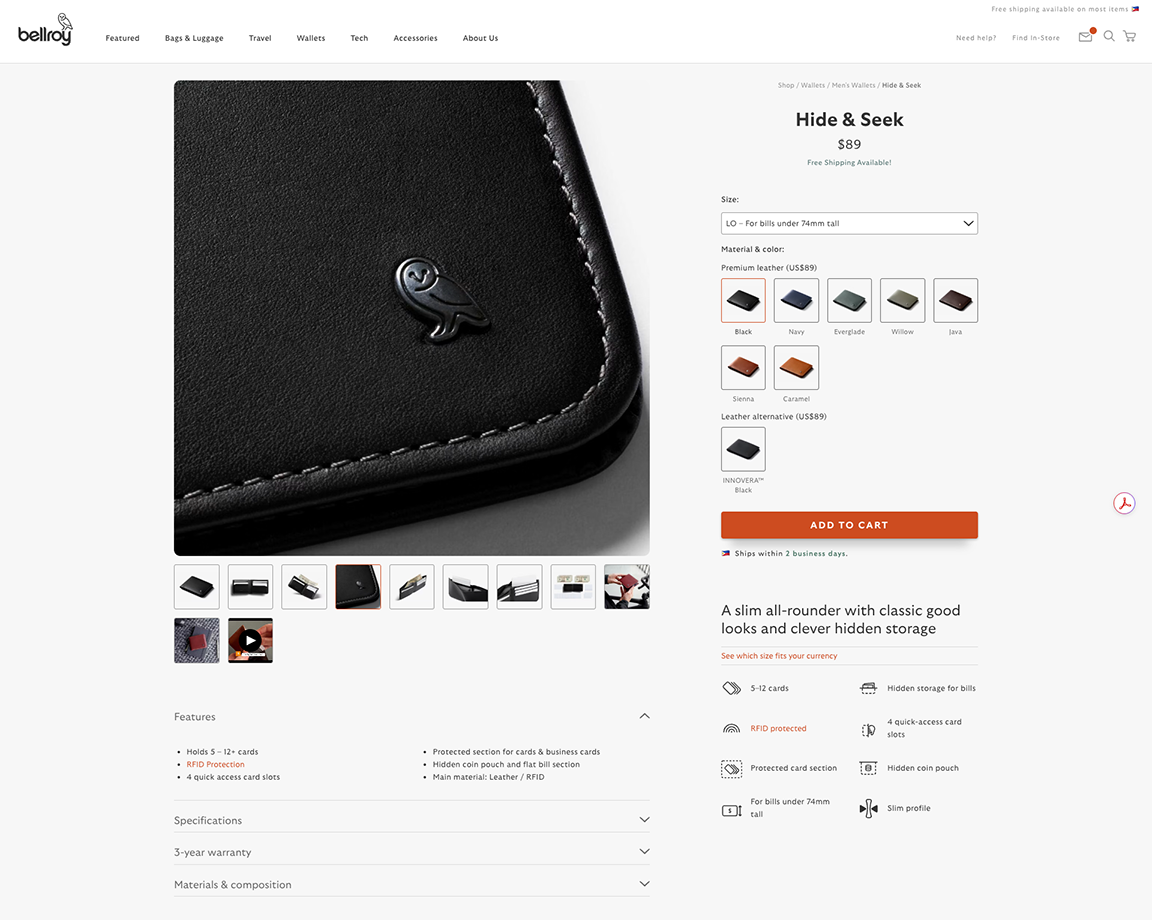
Photos that fail at this job create friction right at the decision point. The shopper isn’t sure, so they leave your site and move onto the next thing.
3. Help shoppers picture themselves using it
People don’t buy products. They buy better versions of their lives. Lifestyle photography – showing the product in context, in use, by a real person – connects the product to the outcome the shopper is after.
A backpack photographed flat on a white background tells you what it looks like, however a backpack on a person walking through an airport tells you something about who you’ll be and what you might look like when carrying it.
Both types of images have a place, but lifestyle photos are what turn browsers into buyers.
4. Perform on every platform
Your product photos don’t live only on your product detail page. They appear in Shopify collection pages, Google Shopping, Instagram feeds, TikTok Shop, email thumbnails, and ad creative. Each platform has different dimensions, a different context, and different competition for the shopper’s attention.
A photo that works perfectly on your website may get cropped badly on Instagram, or a square image that looks great in a collection grid may lose all its detail when served as a Google Shopping thumbnail.
Great ecommerce product photography is designed to perform across all of these platforms, not optimized for one and ignored on the rest.
Diagnose your current photos
Before you spend time or money improving your photos, get an accurate read on where they actually stand. Most store owners are too close to their own products to see what a stranger sees.
Here’s a fast diagnostic you can run today:
The 5-second test
Show your product page to someone who doesn’t know your store. Give them exactly five seconds, then close it. Ask them to describe what they saw. If they can’t accurately describe the product, or if they describe something adjacent to what you’re selling, your photos aren’t communicating.
The scroll test
Open your collection page and scroll without stopping. Notice which products make you pause. The photos that don’t make you pause aren’t working, even if you think every photo looks fine. Shoppers won’t pause either.
The comparison test
Search your product category on Google Shopping. If your photo doesn’t stop you mid-scroll, it won’t stop a shopper either.
The mobile test
Take a look at your store on your phone. Check whether the main image loads quickly, whether the product fills the frame, and whether the key detail you’d expect to see is still readable at that size. For more on the mobile side specifically, see our guide to why product photos look bad on mobile.
If any of these tests surfaced a problem, you now know where to start fixing.
The fix is a repeatable system, not a better camera
Here’s the most common mistake store owners make when they decide to improve their ecommerce product photography: they buy a better camera.
Better equipment rarely makes bad photos good. What makes photos consistently good is a repeatable system – a defined set of conditions, decisions, and quality checks that you run the same way every single time.
With a system, every product you photograph comes out consistent, and your store develops a recognizable visual identity. Customers start to feel like they know your brand. Trust compounds.
Without a system, you reshoot the same products twice, end up with half your catalog looking one way and half looking another, and spend more time correcting than creating.
A solid product photography system covers: how you set up and shoot each product (same conditions, every time), how you process the raw images into final files, how you name and store files so you can find things six months from now, and a quality check before anything goes live.
The camera matters far less than people think. Today’s smartphones, used correctly and consistently, produce images that are completely acceptable for your ecommerce store. The difference between store owners with great photos and store owners with mediocre ones isn’t the equipment. It’s the consistency.
For the full system – every step, every decision – download our complete photography guide linked at the end.
When to do it yourself vs. bring in software or a partner
There is no single right way to handle product photography for ecommerce. Not every store owner should set up a home studio and shoot their own products. Not every store should hire an agency for a full catalog shoot. The right call depends on where you are at in your business.
Do it yourself if:
You’re early stage or your catalog is small. Remember, the value of moving fast outweighs the cost of imperfection. You have time to build the habit and run the system consistently. Your products are relatively simple visually and don’t require specialized lighting or styling to read correctly on screen.
Use software to handle the mechanical work if:
You already have decent shots but backgrounds, sizing, or consistency are the weak link. You’re spending more time in post-processing than you should be on tasks that are repeatable and automatable – background removal, cropping, compressing files to the right specs. You need to process a large catalog and doing it manually isn’t realistic.
This is where tools like Pixc’s Background Removal and Photo Resize fit in. They handle the repeatable, mechanical end of the workflow inside your Shopify admin so you spend your time photographing, not processing.
Bring in a professional if:
Your products are high-ticket, highly tactile, or visually complex – jewelry, furniture, clothing where fit matters. You’ve optimized everything else in your funnel and photography is clearly the remaining bottleneck. You’ve done the math and the conversion uplift from professional photos will cover the cost of the shoot within a reasonable window.
You don’t have to pick one approach permanently. Most growing stores start with DIY, layer in software to clean up output and keep the catalog consistent, and eventually bring in a professional photographer for hero images while continuing to handle the rest themselves.
Get the full playbook
This post covered the why and the what – why ecommerce product photography drives conversions more than almost anything else, what your photos need to do, how to tell whether yours are falling short, and how to decide on your approach.
For the how, we’ve put together a complete step-by-step guide that walks through the full process: how to set up your shoot at any budget, how to handle the processing side, and how to get your photos working across every surface where they appear.
Download the complete ecommerce product photography guide here.
If your photos are already taken but the processing side is the weak link – backgrounds, sizing, consistency across your catalog – the Pixc app suite handles all of that directly in your Shopify admin. Start with Photo Resize if your images are the wrong dimensions, or Background Removal if your backgrounds are inconsistent.
Either way: your photos are fixable. You don’t need a new camera, a professional studio, or a budget you don’t have. You need a repeatable system. Now you know how to take product photos that sell.